
It’s not easy to clad a garage door with wood, and it’s also not difficult. It depends on how you do it and the tools used. Are you a DIY fan? You’ll find the process of resurfacing your garage door with wood exciting.
Do you know how to clad a garage door with wood? Wood over garage door is not uncommon. Most modern homeowners have embraced the idea because of its aesthetic appeal.
And what’s great about cladding a garage door with wood? You can do it to doors made with various materials, and the procedure is the same.

Can You Apply Wood to Garage Door?
Yes.
You can set the tone for your custom home by adding wood to your garage door. Despite making your garage door eye-catching, the wood overlay increases its depth.
It’s an excellent way of making the door rhyme and complement well with other parts of your home. A great example is when you match its color and the wood type with that of your front door.
The added wood layer protects the door from damage from within and outside. It also insulates the door to prevent heat from escaping the garage.
In the cold seasons, wood-clad garage doors prevent cold from entering the garage.
Can You Make Your Garage Door Look Like Wood?
Of course!
And no, it’s not about replacing it with a wooden door or adding wood to its exterior. That might be expensive and messy.
Then what?
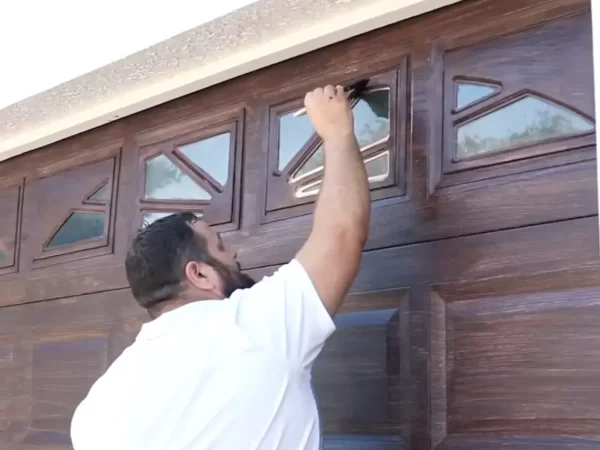
You can paint the door using wood-look paint. Interesting, right?
The market has many of them. You only need to choose a gel stain of your preference. Traditional wood stains are ideal for less porous surfaces because they are thin. But modern gel stains work like magic on all materials.
After painting your garage door, apply a varnish finish to protect the wood finish. It’s amazing how a simple DIY metal or other garage door staining project can make it appear like wood.
What Type Of Wood is Used For Garage Door Trim?
Cedarwood.
Wondering why?
Its low density and high proportioned air spaces make it a great thermal insulator. This softwood help maintain the garage cool during the hot days and warm during the cold days.
Cedar wood comes in different species, and the Red Cedar ranks on top as an exceptional insulator. You cannot compare it with brick, concrete, or steel.
Cedarwood can also live hundreds of years. It also maintains its original look and strength because of its resistance to fungi and bacteria.
Most garages are a den of busy-sound-producing activities. Cedar trees are renowned for their sound dampening abilities. Thanks to its lightweight feature, it’s a breeze to do a garage door wood overlay with cedar wood.
Did you know that cedar wood is resistant to fire? It has a low flame spreading ratio.
But in the absence of cedar wood, you should not be desperate. You can use other favorable wood types such as;
- Cherry
- European oak
- Larch
- Iroko
- Douglas Fir
Now that you know the wood type to use, how do you add wood to the garage door?
Let’s dive into it!
How to Clad a Garage Door with Wood
Though there are various DIY garage door cladding ideas, the one illustrated in this guide is needle moving. Here’s how you do it;
Step 1: Collect the Required Materials
It will be a waste of time to timber clad a garage door without all the necessary materials. You will have to select the right wood for the panels.
Cedar wood is the best, but if not accessible, you can opt for other types like the Siberian larch based on their availability, budget, and preference. Whatever wood you choose, make sure it’s lightweight, weather-resistant, and durable.
The materials you need include;
- Lumbar or veneer panels
- Tape measure
- Panel saw
- Pencil
- Paper
- Clamping pliers
- A drill or impact driver
- Wrench
- Adhesive
Step 2: Get the Lumbar Panels Ready
This step is only applicable if the commercially available lumbar panels do not fit your garage door. A single garage door usually has a standard width of 8 – feet or 96 – inches. It’s twice the value for double garage doors.
You can get garage door panels in 18 – inches, 21 – inches, or 24 – inches. You need to take its measurements to know if your garage door fits the lumbar boards you pick.
Then look for the lumber boards that fit your garage door’s dimensions when combined. Choose the number that covers your entire garage.
Prepared veneer panels that suit your garage’s measurements are best for first-timers.
But if your garage door’s dimensions do not fit any veneer panels found on the market, you’ll need to prepare yours or custom them to fit.
It entails cutting them into the correct garage door panel size. First, take the tape measure and measure the length and width of one of your garage door’s panels.
Record the results on a piece of paper. Then multiply that amount with the number of panels on your garage door. It will give you the number of veneer panels you require for the entire door.
Alternatively, you can take the measurements to a professional to cut the right lumbar size for your garage door.
If the veneer panels don’t blend well with the exterior of your home, this step is the best to adjust them. Paint them with wood stain to possess a color you prefer as it keeps its natural look.
The wood stain will also protect the wood from sunlight and make it water-resistant.
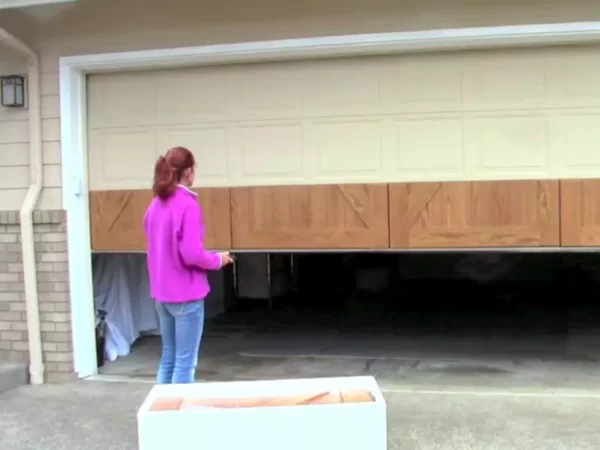
Step 3: Take Out Your Garage Door
With the lumber boards or veneer panels ready to go, it’s time to work on the door.
The first step is to remove its panels. To attach wood panels to an aluminum garage door with its panels intact is a challenge.
It’s not an easy task to remove your garage door alone. You may need some extra hands while uninstalling the door.
Alternatively, you may seek the services of a professional to take the door out. How to remove a garage door depends on its design and how it got installed.
Step 4: Add Veneer Panels to Garage Door
With your garage door’s panels on the floor, it’s time to cover them with wood. Resurfacing garage door panels requires a lot of care and attention. A small mistake will cost you time and money.
Begin by applying a strong adhesive to your garage door’s panels. Start with one panel at a time. After applying glue, arrange the veneer panels of the correct size onto the panel.
Then screw the veneer panels or lumber boards onto the door panel.
The screws should be long enough to penetrate the wooden boards and attach them to the garage door.
Repeat the same procedure for all the door panels. Ensure you screw all the sides of each veneer panel to secure them firmly.
Leave the resurfaced door to sit for a few hours when you finish. It gives the glue time to cure.
Step 5: Put Back the Garage Door
After the glue has dried, it’s time to put back your garage door. Like before, you’ll need help with reinstalling your garage door.
Most garage doors are large. It may not be possible to clad a garage door with wood alone. But if there’s no one around to help you out, and you’ve got some extra bucks to spend, you can hire an expert.
Garage door cladding ideas are many. It depends on your garage door’s design and how you want it to appear.
You may want to clad it with plain or patterned veneer panels. The material used to make it also determines how to resurface the garage door.
Building a wood garage door is straightforward but will take much of your time. You may also need someone to help you remove and reinstall the garage door.
Wood-clad garage doors have many benefits. They improve your garage gate’s appearance and make it resistant to water, cold, and heat.
Also, depending on the kind of wood you use, it boosts the door’s lifespan. Cedar wood is the best to use for garage doors.
To clad a garage door with wood is not the only way to make it appear wooden-like. If you don’t have the lumber boards or veneer panels, you can fake garage door façade by staining it. The market has various reliable wood stains you can use to make the garage door appear like wood.
The above guide on how to clad a garage door with wood will help you carry out the procedure without the assistance of a professional. You’ll need to follow each step keenly for optimal results.
Recent Posts
Many DIY lovers and engineers want to build something cool in their garages. What's cooler than a kit airplane? In this setup, the builder receives parts and puts them together in their own space....
Diamond blades have various uses, from cutting tiles and glass to cutting gems and semiconductor materials. If you’re planning to start a renovation or building project, you’ll need a diamond...