
If you understand the structures and have appropriate right tools, you can raise a garage ceiling from 6′ to 8′ or 8′ to 10′ feet without removing the roof.
The key is that you’ll have to work with trusses to raise the garage ceiling. You can’t modify the trusses because they are built structural elements. But you can modify the trusses so that you can increase the height of the ceilings in the garage.
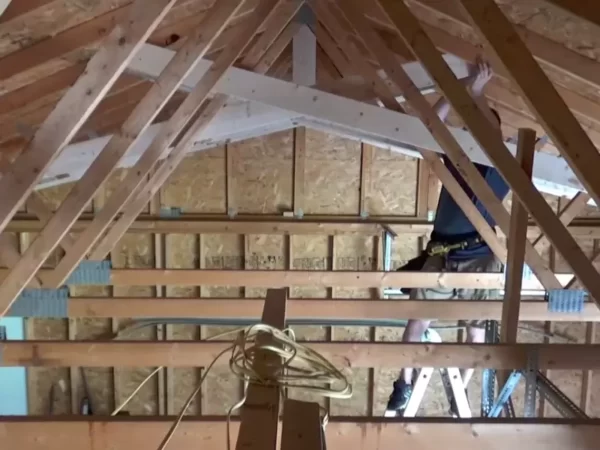
Working with trusses is not easy at all. It requires a lot of engineering work. It can be dangerous if you don’t do it properly.
Read More: How to Insulate Garage Ceiling With Foam Board.
So, you must be careful and safe with every calculation and step, or you could spend some money to consult with a structural engineer who can do all the design work for you.

How to Raise the Ceiling in Garage
You need some tools to complete all the steps.
- Woodcutting machine (ex. miter saw)
- Safety Glasses
- Gloves
- Ear protection
- AutoCAD for calculations (you can do manually too)
- Measuring Tape
- Hardware for attaching new trusses (usually nails)
Step 1. Explore the space above the current roof
In the first step, you will have to calculate how much space you have left above the lower chord so that you can know how much higher you can increase the ceiling.
Take out your measuring tape and write down all the measurements which you will get from above the lower chord. Plus, measure the wall-to-wall distance where you would want to place new beefier scissors trusses to raise the height. The above video has some guidelines.
After that, you will have to find out the strength of the top trusses.
Step 2. Finding out the strength of top chord trusses
Now in this step, you will have to find out the strength of top chord trusses.
Figure out the maximum snow and wind load in the area and find out what are the safety factors of these trusses. A structural engineer will know the typical loads in your area.
Step 3. Design a new trusses
Now after examining the strength of old trusses, you have to design a model for new scissor trusses. You can easily design new trusses with the help of CAD.
CAD will give you a more accurate design for the new trusses to make sure the new ones fit perfectly. You can also design mock cars in CAD. So that you can have a better look that what it will look like after completion.
Calculate every single dimension and every single angle in the CAD. There needs to be a safety factor on each piece of wood.
If you’re not comfortable repeating the calculations shown in the video or using CAD, consult with a structural engineer. They can give you answers about how to best support your garage roof – and having the measurements ready will help them work faster.
Step 4. Taking out a safety factor
Safety is always first. The good thing about using a CAD model is that we make everything ready before starting the process. And the model helps to clarify many of the steps.
So, after all the calculations and making the model, now calculate the safety factor in the model. Make sure that our safety factor is just as high as it was in the original design. A structural engineer will know the appropriate safety factor for your garage design.
You can easily calculate the safety factor in CAD too. Now after calculating the safety factors, you can now start to make new trusses for the top chord.
Step 5. Make new beefier scissor trusses
Now in this step, take a woodcutting machine (a miter saw like this DeWalt 12-inch Miter Saw* is good for safely making both straight cuts and different angles) and start making trusses. Cut the wood into the scissor trusses which you will place at the top chord trusses.
But remember that, you will have to cut the trusses into the exact dimensions and sizes which you calculated in the model. You can’t make mistakes; otherwise it won’t fit in. And then fix it on the top chord using appropriate attachment hardware (usually nails).
Step 6. Fix the new trusses
Now we are almost on the last few steps. In this step, you will have to fix the new beefier scissors trusses into the top chord. You will fix them in a cross, which is why it is called scissors trusses.
After fixing the new trusses, apply some load to them. So that you can make sure that the new trusses are strong enough to hold the roof. After fixing the new trusses, you will have to remove the lower trusses.
Step 7. Removing the lower chord
In this step, you will remove the lower chord (lower trusses).
Because new beefier scissors trusses have been fixed on the place of it, we don’t need them now. After removing them you will easily raise the ceiling from 8’ to 10’ for even more space in your garage height.
Other Options for Raising a Garage Roof
There are even some more methods, some of them like raising a garage roof by jacking up. In this method, a hydraulic lift is used for raising the garage ceiling joist but for that, your garage should be well structured and strong.
Of course, some garages just don’t have the ability to raise the roof. For example, garages built into the lower floors of homes might not have any extra room because of the floors above. In that case, you would have to build a new garage in order to have higher ceilings.
These all methods are time consuming and expensive compared to adding scissor joists. Even if you consult with a structural engineer, raising the garage ceiling by placing new trusses at the top chord and replacing old trusses is a cost effective option.
Recent Posts
Many DIY lovers and engineers want to build something cool in their garages. What's cooler than a kit airplane? In this setup, the builder receives parts and puts them together in their own space....
Diamond blades have various uses, from cutting tiles and glass to cutting gems and semiconductor materials. If you’re planning to start a renovation or building project, you’ll need a diamond...